

Soundproofing Solutions for Home Recording Studio
Table of Contents
- Understanding Soundproofing Solutions for Home Recording Studio
- Soundproofing vs Sound Absorption: Know the Difference
- Acoustic Treatment for Home Studio: Controlling Reflections and Noise
- How to Soundproof a Door for Recording: Sealing Air Gaps
- Building Structural Sound Isolation: Walls, Ceilings, and Decoupling
- Budget-Friendly Soundproofing Hacks and Non-Destructive Solutions
- Choosing the Right Materials: Fiberglass vs Foam and Beyond
- Vocal Booth Construction and Decibel Reduction Expectations
- Frequently Asked Questions
Last Updated: October 3, 2026
Understanding Soundproofing Solutions for Home Recording Studio
Soundproofing solutions for home recording studio fall into two categories: blocking sound from entering or leaving the room, and controlling how sound behaves once it's inside. Blocking sound requires mass and isolation; controlling reflections requires absorption and diffusion. A home recording studio needs both.
Soundproofing vs Sound Absorption: Know the Difference
Soundproofing blocks sound from traveling through walls, doors, and ceilings using mass, decoupling, and sealing. Sound absorption (acoustic treatment) controls reflections and echo inside your room using fiberglass, foam, and mineral wool. Most home recordists need both. True soundproofing is expensive and structural; acoustic treatment is affordable and non-destructive, delivering better results per dollar for home studios.
Acoustic Treatment for Home Studio: Controlling Reflections and Noise
Acoustic treatment absorbs energy at specific frequencies and prevents sound from bouncing off hard surfaces, eliminating echo, flutter echo, and standing waves.
Using Fiberglass Panels for Mid-to-High Frequency Control
The VEVOR Fiberglass Acoustic Panels - 4-Pack uses 100% white fiberglass with an NRC rating of 0.95 (absorbs 95% of sound). Install on first reflection points: walls beside your microphone, ceiling above your head, and wall behind the mic. A 4-pack covers about 20 square feet; most home studios need 2-3 sets.

Bass Traps and Low-Frequency Management
Bass wavelengths are long and build up in corners, creating boomy recordings. Bass traps absorb low frequencies; thicker material absorbs lower frequencies. A 6-inch trap absorbs down to around 125 Hz; a 12-inch trap reaches closer to 60 Hz. For budget approaches, stack fiberglass panels in corners and cover with burlap fabric, effective above 100 Hz.
Room modes (standing waves) occur at specific frequencies determined by room dimensions. Combine room treatment with microphone placement, moving your mic away from room boundaries reduces bass buildup capture.
How to Soundproof a Door for Recording: Sealing Air Gaps
Air gaps around doors are major sound leaks. Start with weatherstripping around the frame and a door sweep at the bottom. For better isolation, add a soundproof blanket or acoustic curtain, non-destructive and removable. Replacing the door with solid core is most effective but expensive; weatherstripping plus a blanket works well for most home studios.
Building Structural Sound Isolation: Walls, Ceilings, and Decoupling
True soundproofing requires isolation. This means decoupling surfaces so sound vibrations don't travel through them.
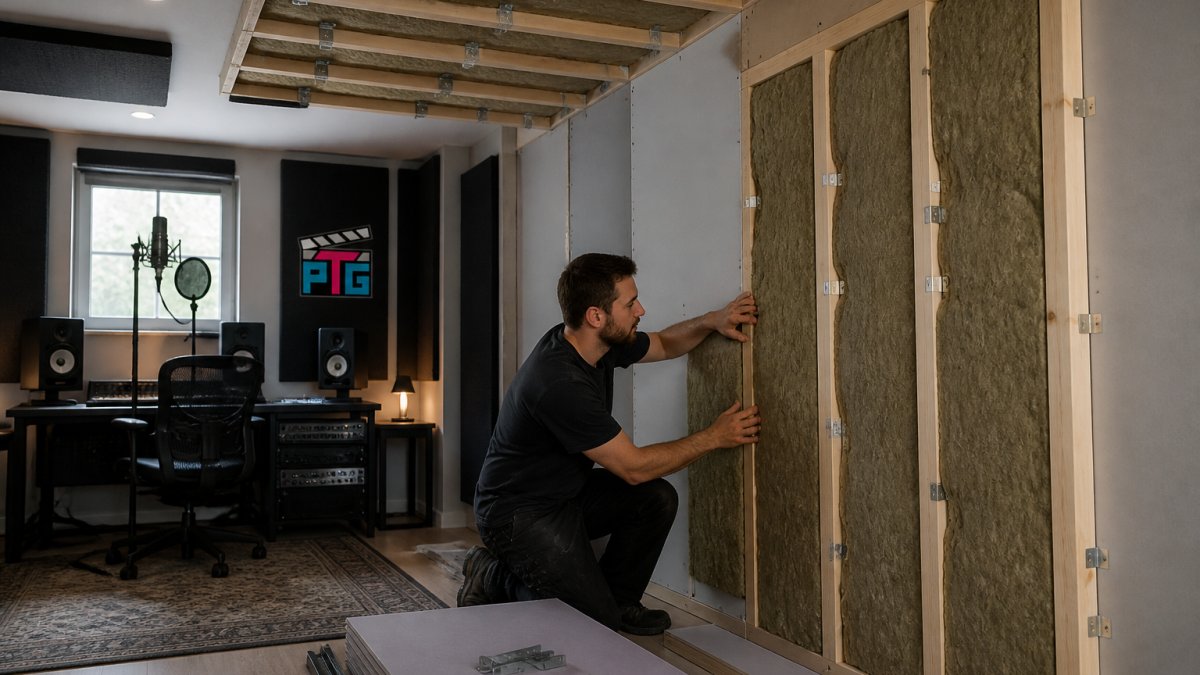
Resilient channels are metal strips that attach to studs. Drywall fastens to the channels instead of directly to the studs. This breaks the vibration path.
Mass-loaded vinyl is a dense material that adds mass to walls. It blocks sound transmission. Attach it under drywall for better isolation. The added weight stops vibrations from passing through.
For ceilings, decoupling is even more important. Sound travels upward easily. A decoupled ceiling (using resilient channels or suspended systems) reduces transmission to the space above.
The most effective approach combines multiple techniques:
- Seal all air gaps with acoustic sealant
- Add mass-loaded vinyl to walls and ceiling
- Use resilient channels to decouple drywall
- Install absorptive materials inside the wall cavity
- Use fiberglass or mineral wool in the cavity
This layered approach stops sound transmission much better than any single method.
Structural isolation is expensive and permanent. It's best for dedicated studio spaces. For rental situations or temporary setups, focus on acoustic treatment first.
Budget-Friendly Soundproofing Hacks and Non-Destructive Solutions
Renters and apartment dwellers face a unique constraint: permanent wall modifications, structural decoupling, and mass-loaded vinyl installation are not options. Yet the search intent "soundproofing solutions for home recording studio" includes millions of renters who need professional-quality recording spaces. Non-destructive solutions are not a compromise, they're a complete strategy.
The Non-Destructive Soundproofing Strategy
Non-destructive soundproofing prioritizes absorption and isolation without permanent installation. The approach works in three layers:
Layer 1: Absorption (Reflections) Heavy moving blankets (12 oz or thicker, $15-$30 each) absorb mid-to-high frequencies similarly to professional acoustic blankets. Hang on two or three walls around your recording position to reduce flutter echo and room reflections by 6-10 dB across 500 Hz-4 kHz. Thick curtains ($40-$80 per panel) work similarly and provide light control. Bookshelves filled with irregularly arranged books absorb roughly 4-6 dB of mid-frequency reflections and look intentional in living spaces.
Layer 2: Bass Management (Low Frequencies) Corner placement of soft furniture absorbs roughly 2-3 dB of bass below 200 Hz. DIY bass traps using cardboard boxes (18-24 inches) filled with rockwool or fiberglass and covered with burlap are removable and renter-friendly; a 12-inch-thick trap absorbs down to approximately 100 Hz. Microphone placement is cheapest: recording in the room center reduces bass buildup, and moving your mic 2-3 feet away from walls reduces low-frequency proximity effect, often solving 50% of bass problems.
Layer 3: External Noise Isolation (Blocking) Weatherstripping ($10-$20) and door sweeps ($5-$10) reduce door transmission by 3-5 dB. Soundproof blankets or acoustic curtains ($30-$60) add another 3-5 dB. Thick curtains reduce window transmission by 2-3 dB; acoustic window inserts provide 5-8 dB but cost $100-$300 per window. HVAC noise and structural vibration are nearly impossible to address without structural work. If external noise is severe, non-destructive solutions have limits.
Combining Non-Destructive Solutions for Professional Results
A complete non-destructive setup for a renter:
VEVOR Fiberglass Acoustic Panels - 4-Pack →
- 2-3 acoustic blankets or heavy curtains ($50-$100)
- 2-3 DIY bass traps in corners ($30-$60 in materials)
- Weatherstripping and door sweep ($20)
- Soundproof blanket for the door ($40)
- Strategic furniture placement (existing items, no cost)
- Quality microphone with cardioid pattern ($150-$300)
Total investment: $290-$520 for a functional, professional-quality recording space.
This setup reduces reflections by 8-12 dB, external noise by 4-8 dB, and provides adequate bass control for most home recording scenarios. It won't match a professionally treated studio, but it delivers broadcast-quality vocal and acoustic instrument recordings.
Aesthetic Integration: Studio Meets Living Space
The biggest barrier to non-destructive soundproofing in apartments is aesthetics. Blankets and bass traps look like a "studio," which conflicts with living space design.
Solutions:
- Use acoustic blankets in neutral colors (gray, black, beige) that match modern decor.
- Arrange bookshelves as part of room design, not as acoustic treatment.
- Position bass traps in corners and cover them with fabric that matches your decor.
- Use curtains that serve double duty: light control and acoustic treatment.
- Record in a corner of a bedroom or office, not a dedicated "studio room."
Many successful home recordists use living rooms, bedrooms, or home offices as recording spaces. Non-destructive treatment allows this flexibility. The space functions as a living area most of the time and a recording studio during sessions.
Choosing the Right Materials: Fiberglass vs Foam and Beyond
Different materials absorb different frequencies. Choosing the right one depends on your problems.
Fiberglass is affordable and effective for mid-to-high frequencies; the VEVOR panels offer excellent value with a 0.95 NRC rating. Acoustic foam is softer and portable but costs more per square foot. Mineral wool absorbs across a wider frequency range and handles low frequencies better but is more expensive. Diffusers scatter sound instead of absorbing it, maintaining natural room tone while reducing flutter echo. Combine materials: fiberglass for general absorption, bass traps in corners, and diffusers strategically for cost-effective results.
Vocal Booth Construction and Decibel Reduction Expectations
A vocal booth is a small, isolated enclosure for recording vocals cleanly by reducing reflections and room noise bleed into your microphone.
Building a Simple Vocal Booth
Build a frame from PVC or wood tubing (1.5-inch PVC is rigid and affordable) and attach VEVOR Fiberglass Acoustic Panels to create three walls and a ceiling. Leave one side open for access and ventilation. A 4-foot by 4-foot by 7-foot booth requires 3-4 panel packs. Line interior walls and ceiling to surround the microphone and vocalist with absorption.
Understanding Decibel Reduction in Recording Context
Decibel reduction metrics are often misunderstood. A 3 dB reduction is the smallest change the human ear perceives as "quieter." A 10 dB reduction sounds roughly half as loud. A 20 dB reduction sounds dramatically quieter.
Reflection reduction (interior acoustic treatment): A well-built vocal booth reduces flutter echo and room reflections by 8-15 dB across mid-to-high frequencies (500 Hz-4 kHz). A cardioid microphone like the Tenlamp PKPRO Large Diaphragm Condenser Microphone from Cameras, Lighting & Audio Equipment already rejects side and rear reflections by design, so booth treatment amplifies this rejection.

External noise isolation (structural soundproofing): A simple booth with fiberglass panels alone provides minimal external isolation, typically 2-4 dB reduction of outside noise. This is because sound travels through the frame and gaps, not just through the panels. If you're recording in a quiet room, this is acceptable.
Low-frequency performance: Bass frequencies (below 200 Hz) are barely affected by a simple fiberglass booth. A 4-inch fiberglass panel has an NRC rating of 0.95 at mid-to-high frequencies but drops to 0.3-0.5 below 250 Hz. If your recording space has rumble from HVAC, traffic, or footsteps, a booth won't solve it.
Realistic Expectations for Home Recording
A vocal booth excels at one thing: capturing a clean vocal with minimal room reflections. It does not provide professional soundproofing. A broadcast-quality vocal recording depends on three factors:
- Microphone technique (40% of the result): Proper mic placement, gain staging, and distance from the source matter more than the room.
- Acoustic treatment (40% of the result): Absorption in the booth and strategic room treatment.
- External noise control (20% of the result): A quiet recording window and isolation from external sources.
A home studio with a simple vocal booth, strategic room treatment, and a quality microphone can achieve professional vocal recordings. The booth reduces reflections significantly. Combined with careful microphone placement and gain control, this setup delivers broadcast-quality results. The limitation is external noise, if your space is inherently noisy, no booth solves that without structural soundproofing.
Frequently Asked Questions
What's the difference between soundproofing and acoustic treatment?
Soundproofing blocks sound from entering or leaving a room by adding mass and isolating vibrations, think sealed doors, resilient channels, and mass-loaded vinyl. Acoustic treatment shapes how sound behaves inside the room by absorbing reflections and controlling standing waves using materials like fiberglass and foam. Most home studios need both: soundproofing to prevent leakage to neighbors, and acoustic treatment to eliminate echo and improve recording clarity.
Can I soundproof a rental space without damaging walls?
Yes. Use self-adhesive acoustic panels like the VEVOR fiberglass panels ($91.99 for a 4-pack), which stick directly to walls without drilling. Add weatherstripping and acoustic sealant around doors and windows, and use heavy curtains or moving blankets as temporary absorbers. These non-destructive solutions won't trigger lease violations and can be removed cleanly when you move.
How much noise reduction should I expect from acoustic panels?
Acoustic panels reduce mid-to-high frequency noise (speech, cymbals, laptop fans) by 5-10 decibels, depending on material thickness and NRC rating. Fiberglass panels with an NRC of 0.95 absorb 95% of sound energy in their frequency range. However, they don't block low-frequency bass or external traffic noise, for that, you need mass-loaded vinyl, drywall decoupling, or sealed construction. Realistic expectation: quieter recordings and less echo, not complete soundproofing.
What's the most cost-effective way to treat a small home studio?
Start with a 4-pack of fiberglass acoustic panels ($91.99) placed on the wall behind your microphone and at reflection points. Add weatherstripping to doors ($10-20) and a quality microphone with a cardioid pattern to isolate your voice. The Tenlamp CG1 condenser mic ($54.99) connects directly to your computer without needing an audio interface, keeping costs low while capturing clean vocals. This $150-170 setup handles mid-to-high frequencies and room reflections effectively.