

Budget Studio Monitors for Small Rooms: Setup Guide
Table of Contents
- Why Budget Studio Monitors Matter for Small Spaces
- Active vs. Passive Studio Monitors: Which Works for Your Room
- Studio Monitor Placement for Small Rooms
- Home Studio Acoustic Treatment Basics
- Key Specs to Compare When Choosing Budget Monitors
- Common Mistakes That Waste Your Budget
- Getting Professional Results Without Breaking the Bank
- Frequently Asked Questions
Last Updated: September 30, 2026
Why Budget Studio Monitors Matter for Small Spaces
Budget studio monitors small rooms deliver professional-grade sound at accessible price points. The difference between amateur and polished audio often comes down to monitoring accuracy, not budget.
Small rooms present unique acoustic challenges: sound bounces off hard surfaces, creating reflections that muddy the mix. Budget monitors designed for nearfield monitoring sit close to the listening position, minimizing room interaction and letting you hear what's actually happening in your content.
Quality monitors unlock better mixing decisions, tighter sound design, and content that competes at a professional level.
Active vs. Passive Studio Monitors: Which Works for Your Room
Active monitors are self-powered with built-in amplifiers, requiring only a single audio cable connection. Passive monitors require external amplification, adding complexity and cost that small-room setups don't justify.
For budget studio monitors in small rooms, active monitors deliver better value: easier setup, less space, and optimized frequency response.
Budget-conscious creators should focus exclusively on active monitors with balanced inputs and straightforward connectivity.
Studio Monitor Placement for Small Rooms
Proper positioning determines how accurately monitors translate your mix to other playback systems. Place monitors at ear level when seated at your mixing position, forming an equilateral triangle between the two speakers and your head. This creates the stereo image and imaging that reveals problems in panning, width, and spatial balance.
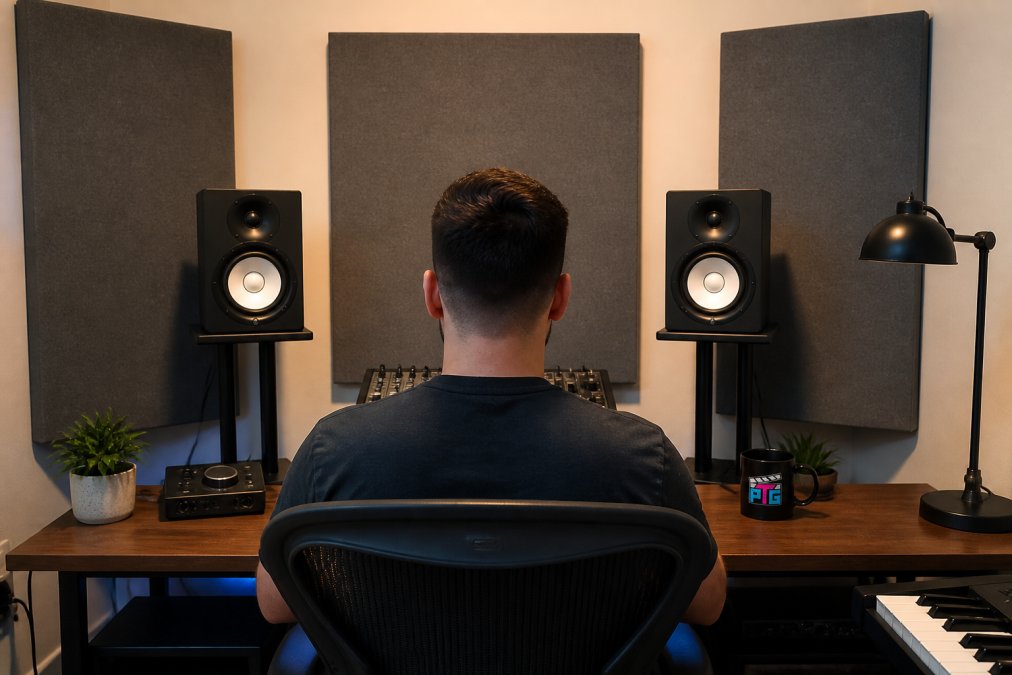
Position monitors 3-5 feet from the listening position, roughly 3-4 feet apart. This nearfield configuration minimizes reflections and lets direct sound dominate.
Avoid placing monitors in corners or against walls; corner placement amplifies bass and introduces acoustic coloration. Proper positioning on monitor stands delivers accuracy.
Symmetry is critical. If one monitor sits on the desk and another on a shelf, the asymmetrical placement creates a lopsided stereo image. Both monitors should be at the same height, angle, and distance from the listening position. Small rooms demand precision because reflections compound quickly.
Home Studio Acoustic Treatment Basics
Untreated small rooms suffer from standing waves and room modes, resonances at specific frequencies determined by room dimensions. Hard surfaces reflect mid and high frequencies, creating early reflections that muddy clarity and imaging.
Physical Acoustic Treatment
Absorption panels target mid-to-high frequency reflections by converting sound energy into heat. Fiberglass or mineral wool panels with an NRC rating of 0.80 or higher work well. A 4-pack of 2-inch-thick panels costs $40-80 and covers primary reflection points in a small room.

Place absorption panels on the wall directly behind the monitors to eliminate reflections that cloud the stereo image. Next, treat side walls at the first reflection point (roughly 2-3 feet left and right at ear level). Avoid over-treating; the goal is balancing reflections, not eliminating them.
Bass traps are thicker absorption (4-6 inches) placed in room corners where low-frequency energy accumulates. A pair in opposite corners costs $100-200 and significantly flattens low-end response in rooms under 150 square feet.
DSP Room Correction: A Modern Alternative
Many budget studio monitors now include built-in DSP (digital signal processing) and room correction software. This technology analyzes your room's frequency response using a measurement microphone, identifies peaks and dips caused by room modes and reflections, and applies inverse EQ to flatten the response. Brands like Kali Audio and PreSonus include this feature on monitors priced $150-400 per pair.
DSP correction doesn't replace physical treatment, it compensates for it. If your room has a 6 dB peak at 80 Hz due to a room mode, DSP applies a 6 dB cut at that frequency, partially offsetting the coloration. This is especially valuable in small rooms where physical treatment space is limited. The trade-off is that DSP correction is only accurate at the listening position; move your head 2 feet to the side and the correction breaks down. Physical treatment works from any position in the room.
For budget-conscious creators, DSP correction on a $200 monitor pair can reduce the need for expensive bass traps. Start with absorption panels on reflection points and use DSP to handle low-end peaks. If you later identify specific problem frequencies, add targeted bass traps.
Treatment Strategy for Small Rooms
VEVOR Fiberglass Acoustic Panels →
Begin with a minimal treatment plan: two absorption panels behind the monitors, two on side walls at first reflection points. This costs $60-120 and handles the reflections that damage clarity most. Mix for a week and listen critically. If bass feels boomy or uncontrolled, add a bass trap in one corner. If the room still sounds colored after DSP correction is enabled, add a second bass trap in the opposite corner.
This staged approach prevents over-treatment and lets you hear the impact of each addition. Many creators find that 4-6 absorption panels plus one bass trap is sufficient for rooms under 120 square feet. Spending $200-300 on treatment paired with a $250 monitor pair produces better results than $800 monitors in an untreated room.
Key Specs to Compare When Choosing Budget Monitors
Frequency Response and Woofer Size
Frequency response indicates how accurately monitors reproduce the full spectrum from bass to treble. Look for monitors rated 50 Hz to 20 kHz or better. This range covers the fundamentals of bass instruments down to the highest harmonic detail in vocals and cymbals. Monitors claiming extended low-end extension (down to 40 Hz or lower) often sacrifice accuracy at higher frequencies, a poor trade in small rooms where bass is already problematic due to room modes.
Woofer size matters in small spaces. A 5-inch woofer is ideal for rooms under 150 square feet; 6-inch woofers work but risk bass buildup in very small rooms (under 100 square feet). Larger woofers (8 inches or more) are designed for control rooms and distance listening, not nearfield work. Smaller woofers integrate better with room acoustics and require less treatment to sound accurate.
Amplifier Power and Headroom
Wattage indicates amplifier power, but total power matters less than how cleanly that power is delivered. A 50-watt monitor with good amp design outperforms a 100-watt monitor with poor design. For small rooms, 30-60 watts per monitor provides plenty of headroom without encouraging excessive volume that damages hearing and masks mix problems. Check the specs for peak SPL (sound pressure level) at 1 meter; a monitor rated 95 dB SPL or higher can reach comfortable mixing levels (85 dB SPL) without strain.
Connectivity: XLR, TRS, and Gain Staging
Look for balanced XLR inputs or combination XLR/TRS inputs. These connectors reject interference and noise, delivering cleaner signal paths from audio interfaces. RCA connections work but are more susceptible to hum and noise, especially in setups with multiple cables running close together or near power supplies.
More importantly, check whether monitors have input level controls (gain knobs). This is critical for proper gain staging. Your audio interface outputs a line-level signal (typically -20 to 0 dBu), and the monitor's input level control lets you match that signal to the monitor's amplifier without clipping or noise. A monitor without input level control forces you to manage gain entirely at the interface, which limits flexibility if you later add a second output or change interfaces.
When setting up, connect your audio interface's main output to the monitor's XLR input using a balanced cable (not RCA). Set the interface output to -6 dB to -3 dB (a conservative level), then adjust the monitor's input level control so that normal mixing peaks hit around -6 dB on the monitor's input meter (if it has one). This leaves headroom and prevents clipping. If the monitor has no input meter, set the level so that a typical mix at moderate volume (85 dB SPL) feels comfortable without the level control maxed out.
Signal-to-Noise Ratio and Background Hum
Signal-to-noise ratio (SNR) measures how much background hum and noise the monitor produces at rest.
DSP and Room Correction Features
Common Mistakes That Waste Your Budget
Buying monitors too large for the room is the most expensive mistake. Large monitors designed for control rooms need distance to integrate properly, creating reflections and phase issues in small spaces. A 5-inch or 6-inch woofer is sufficient for rooms under 150 square feet. Bigger isn't better; it's just louder and more problematic.
Getting Professional Results Without Breaking the Bank
Professional mixes come from accurate monitoring, not expensive gear. Creators working with budget studio monitors in small rooms consistently produce competitive work by combining affordable monitors with proper placement, acoustic treatment, and disciplined mixing practices.
Frequently Asked Questions
What's the difference between active and passive studio monitors?
Active studio monitors have built-in amplifiers, so they connect directly to your audio interface with balanced XLR or TRS cables. Passive monitors require an external amplifier. For small rooms and home studios, active monitors are the practical choice, they're simpler to set up, take up less space, and cost significantly less. Most budget studio monitors are active models designed specifically for compact spaces.
How should I position studio monitors in a small room?
Place monitors at ear level (tweeter aligned with your ears when seated) in an equilateral triangle formation with your listening position. In small rooms, keep monitors 3-5 feet from walls to reduce bass buildup and room mode issues. Use monitor stands or isolation pads to decouple them from your desk and reduce vibration transfer. Avoid corners and symmetrical room positions, which amplify low-end problems. This placement improves frequency response and stereo imaging significantly.
Do I need acoustic treatment if I'm using budget studio monitors?
Yes, acoustic treatment is essential for accurate monitoring in small rooms, regardless of monitor cost. Hard surfaces create reflections that color your mix and mask problems. Start with absorption panels targeting mid-to-high frequencies on the first reflection points (walls beside and behind your monitors). VEVOR Fiberglass Acoustic Panels with NRC 0.95 rating offer an affordable way to treat a small space for under $100. Even basic treatment dramatically improves the accuracy of budget monitors.
Are budget studio monitors good enough for professional mixing and mastering?
Budget monitors can produce accurate, flat frequency response and honest transient detail if you choose models with quality drivers and proper room treatment. The limitation isn't the monitor, it's your room. A $300 pair of monitors in an untreated small room will sound worse than a $800 pair in a treated space. Budget monitors excel for content creation, podcast production, and mixing for streaming. For critical mastering work, you need both good monitors and serious acoustic treatment, which increases total cost.
Small room acoustics present real challenges, but they're solvable with affordable tools and smart setup decisions. Perfect Take Gear's acoustic panels and monitoring resources help creators transform cramped spaces into functional studios that produce competitive audio. Start with quality budget monitors, treat the room properly, and invest in learning how to use what you have effectively. Professional results follow.