

How to Set Up Gaming Lighting for Streaming
Table of Contents
- What You'll Need Before You Start
- Three-Point Lighting Setup for Streamers
- How to Use RGB Lights for Gaming Room Atmosphere
- Preventing Glare on Glasses While Streaming
- Camera Settings That Work With Your Gaming Lighting
- Common Mistakes to Avoid
- Conclusion
- Frequently Asked Questions
Last Updated: September 10, 2026
What You'll Need Before You Start
Gaming lighting is the deliberate use of key, fill, and accent lights to make a streamer look sharp on camera and the room look alive behind them. Get it right and viewers stay; get it wrong and they click away in seconds. This guide from Perfect Take Gear walks through the full setup, from a basic three-point rig to RGB atmosphere and the camera settings that tie it together.
You don't need a studio to learn how to set up gaming lighting for streaming. You need three lights, a way to soften them, and about an hour.
Here's what to gather before you move a single stand:
- Two to three LED panel lights or a ring light, ideally dimmable and bi-color
- One RGB light or light bar for background color
- Diffusion material: softbox, white shower curtain, or parchment paper
- Light stands and mounts that fit your desk or tripod threads
- A camera or webcam with manual exposure control
- Extension cords and cable ties
Three-Point Lighting Setup for Streamers
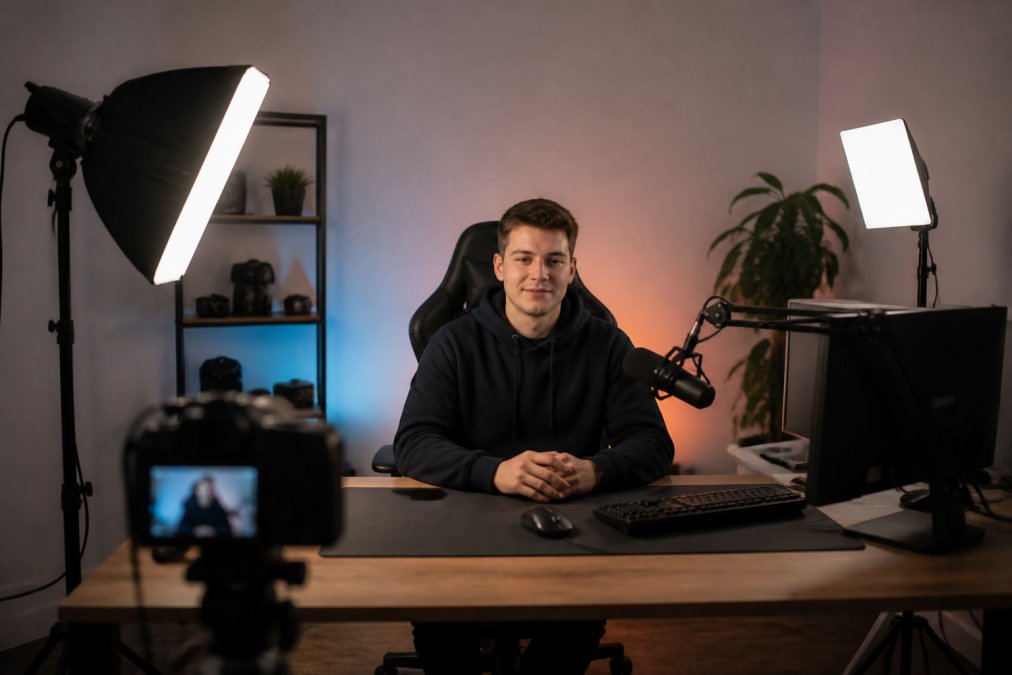
Three-point lighting is the standard setup for streamers: a key light for your face, a fill light to soften shadows, and a backlight to separate you from the wall. It works because each light solves one specific problem instead of one light trying to do everything.

Here's the sequence that works in practice: place the key first, add fill until shadows soften, then add backlight until your shoulders stop blending into the background.
Key Light: Position and Angle
The key light is your brightest source and it goes at roughly 45 degrees to one side of your face, slightly above eye level (nasa.gov). Angle it down toward your nose, not straight across.
What most guides miss is that height matters more than distance. A key light sitting level with your eyes flattens your face. Raise it 15-30 centimeters above eye level and tilt it down to get definition under the cheekbones.
A common mistake is moving the key too close to the camera. That kills the shadow falloff that makes a face look three-dimensional. Push it to the side and let the fill do the work.
Fill Light: Softening the Shadows
The fill light sits opposite the key, dimmer by roughly half, and its only job is shadow reduction. It should never be bright enough to cast its own shadow.
Position it at about 45 degrees on the opposite side, or directly beside the camera if space is tight. Dial it down until the shadow side of your face is visible but not flattened.
Backlight: Separating You From the Background
The backlight goes behind you, aimed at the back of your head and shoulders. It creates a rim of light that pulls you off the wall, which is what gives a stream its depth.
Keep it out of frame and point it down at a shallow angle. If you see a hot spot on your shoulder, it's too strong. A subtle edge is the goal, not a spotlight.
How to Use RGB Lights for Gaming Room Atmosphere
RGB lighting handles atmosphere, not your face. The trick is keeping it entirely in the background so it never competes with your key light. Most streamers get this wrong by treating RGB as a second key light, which tints skin tones and forces constant white balance corrections.
Placement Rules That Actually Work
Mount an RGB bar or panel behind your desk, aimed at the wall rather than at you. A wash of color on the wall reads as depth on camera. Color aimed at your face reads as a mistake.
The most common pattern is a two-zone setup: one RGB source behind the monitor aimed at the wall, and a second source behind you aimed at the ceiling or back wall. This creates a gradient that separates you from the background without spilling onto your skin.
Keep RGB sources at least 3 feet behind your seating position (energy.gov). Closer than that, and the color wraps around your shoulders and contaminates your key light.
Color Selection and Brightness
Match the RGB hue to your stream's mood or your channel branding, but understand the trade-off: saturated colors like deep blue or magenta read as more dramatic on camera but are harder for webcams to render accurately. Softer pastels and warm ambers are more forgiving.
Keep brightness low enough that it doesn't spill onto your skin. A useful test: pause your camera preview and look at your face. If you see any color cast on your cheeks or forehead, the RGB is too bright or too close. Dial it down until your skin reads neutral.
For competitive gaming streams, many streamers use a static color that matches their overlay branding. For variety or just chatting, slow color cycling works, but avoid rapid strobe or music-sync modes during gameplay because they distract viewers and can trigger photosensitivity issues.
Sync and Control
Most RGB bars and panels support app control, remote control, or desktop software. If you stream for long sessions, app control is more convenient than crawling behind your desk to adjust a dial. Look for lights that remember their last setting after a power cycle, so you don't have to reconfigure every time you turn on your setup.
If you use music-sync or sound-reactive modes, point the microphone away from your speakers or use a dedicated audio input. Otherwise, game audio and voice will trigger the lights unpredictably, which looks chaotic on camera.
Perfect Take Gear's guide to creator lighting setups covers how accent lights layer with a primary setup, and the Smart LED Symphony RGB Music Sync Ambient Light is built for exactly this: a sound-reactive bar that mounts behind a monitor and reacts to your game audio or voice.

Preventing Glare on Glasses While Streaming
Glare on glasses is a positioning problem, not a gear problem. Move the light, and the reflection moves with it. Most guides ignore this entirely, which leaves glasses-wearing streamers stuck with distracting reflections that make them look unprofessional.
Why Glare Happens
Glare appears when a light source reflects off the curved surface of your lens directly into the camera. The angle of incidence equals the angle of reflection, so the fix is always about changing the angle between the light, your glasses, and the camera.
The two variables you control are light height and light position relative to your face. A light directly in front of you at eye level will always reflect into the lens. A light above and to the side will reflect downward and away.
The Height and Angle Fix
The most effective fix is to raise your lights higher and angle them down more steeply. A light source above and in front of you reflects off the lens and downward, away from the camera. A light at eye level reflects straight into the lens.
A practical starting point: raise your key light so it sits 12-18 inches above your eye level, then tilt it down at a 30-45 degree angle toward your face. This alone eliminates glare for most glasses wearers.
If raising the lights isn't possible, shift them further to the sides. The reflection follows the light's angle, so moving the source left or right pushes the glare out of frame. Even a 6-inch lateral shift can move the reflection off the lens entirely.
Diffusion and Intensity Adjustments
Add diffusion to soften the light source, which spreads the reflection into a faint glow instead of a hard dot. A softbox, white shower curtain, or parchment paper all work. The larger the diffused surface area, the softer the reflection.
Lower the key light's intensity and raise your camera's exposure compensation to compensate. This reduces the brightness of the reflection without darkening your face. A 20-30% intensity reduction paired with a corresponding exposure bump often makes glare invisible.
Glasses-Specific Adjustments
Tilt the glasses' arms down slightly so the lens angles away from the key light. This changes the reflection angle without moving your lights. Even a 5-degree tilt can help.
If you wear glasses and stream regularly, a ring light is often worse than a panel. The circular shape reflects as a visible ring in the lens. A rectangular softbox or panel reflects as a soft, easy-to-hide shape.

Anti-reflective coating on your lenses is the most permanent fix. If you're buying new glasses anyway, ask for it. It reduces the intensity of reflections by a significant margin and makes positioning far more forgiving.
When Nothing Works
If you've tried every angle and still see glare, consider removing your glasses on camera if your vision allows it, or switching to contacts for streaming sessions. Some streamers keep a pair of non-prescription glasses with anti-reflective coating specifically for camera work.
Camera Settings That Work With Your Gaming Lighting
Camera settings and lighting are one system. Change the light and the camera has to follow, or the image fights itself.
Color Temperature, White Balance, and Exposure
Set your white balance manually to match your key light's color temperature, expressed in Kelvin. A 5600K key light wants a 5600K white balance. Auto white balance drifts as RGB lights change color, and drifting white balance is the most common reason a stream looks unprofessional.
Turn off auto exposure and set it manually. Auto exposure hunts for brightness as you move, which makes the whole frame pulse. Lock it once your key light is set.
For gaming lighting specifically, a few settings matter most:
| Setting | What to Set | Why It Matters |
|---|---|---|
| White balance | Match key light Kelvin | Stops color drift from RGB changes |
| Exposure | Manual, locked | Prevents pulsing as you move |
| Gain | As low as possible | High gain adds noise in dark rooms |
| Shutter speed | 1/50 to 1/60 | Smooth motion, standard for streaming |
| Aperture | f/2.0 to f/2.8 | Blurs background, isolates subject |
If your room is dark and you can't add light, gain is your enemy. Raising gain brightens the image but adds visible grain. Add a light instead.
Common Mistakes to Avoid
The most common mistake is treating lighting and camera settings as separate jobs. They aren't. Every light you add changes what the camera needs.
The second mistake is over-lighting. More lights don't mean a better image. Three well-placed lights beat six badly placed ones every time, and each extra source adds another shadow to manage.
The third is ignoring color accuracy. A light with a low CRI (Color Rendering Index) makes skin tones look off no matter how you set your camera. Look for CRI above 90 for anything pointed at your face.
Conclusion
Getting gaming lighting right takes an afternoon, not a studio budget, and the payoff shows up immediately in how professional your stream looks. The setup is repeatable: key light at 45 degrees, fill to soften, backlight for separation, RGB behind you for mood, and camera settings locked to match.
Most streamers stall because they buy lights one at a time and never build a system. The 18-Inch RGB Ring Light Kit with Tripod covers a full face-and-desk setup, while the Ulanzi LT003 RGB Panel Light delivers the 2500K-9000K range and CRI above 95 that accurate skin tones require. Get started with Perfect Take Gear and turn your gaming corner into a setup that looks like a studio.
Frequently Asked Questions
How do I set up good lighting for streaming on a budget?
Start with one strong key light and a white foam board or sheer curtain as a DIY diffuser to soften shadows. A ring light kit with an adjustable tripod covers your key light and fill in one purchase. Add a small RGB panel behind you for backlight separation. You do not need three separate fixtures to get a clean look; one light plus diffusion and a background accent gets you most of the way there.
What is the best color temperature for streaming lights?
Set your key and fill lights to around 5000K to 5600K, which matches daylight and keeps skin tones natural on camera. If your room has warm overhead bulbs, either match your lights to that temperature or turn the overheads off. Mixed color temperatures create orange and blue patches on your face that are hard to fix in editing. Lock your camera's white balance manually once your lights are set.
Do I need a ring light or a softbox for gaming?
Both work, but they solve different problems. A ring light gives even, shadow-free light and a circular catchlight in your eyes, which suits face-cam-heavy streams. A softbox produces softer, more directional light with better control over spill, which suits setups where you want moodier contrast. Many streamers use a ring light as the key and an RGB panel for background color.
How can I prevent glare on my glasses while streaming?
Raise your key light above eye level and angle it down toward your face at roughly 30 to 45 degrees. Move it slightly to the side rather than dead center. If glare persists, tilt the light further up or add a polarizing filter to your camera lens. Lowering light intensity and increasing camera gain slightly can also reduce the bright reflection without washing out your face.