

How to Get Professional Audio Quality: A 2026 Guide
Table of Contents
- How to Get Professional Audio Quality: Essential Foundations
- Best Microphones for Recording: Choosing the Right Mic for Your Setup
- Microphone Placement and Gain Staging Techniques
- Acoustic Treatment for Home Studio: Room Environment Optimization
- Audio Recording Techniques: Capture, Signal Levels, and Noise Control
- Mixing and Mastering Tips: EQ, Compression, and Post-Production Workflow
- Budget-Specific Workflows: Professional Quality Without Premium Pricing
- Common Mistakes That Degrade Audio Quality
How to Get Professional Audio Quality: A 2026 Guide
Last Updated: August 2, 2026
How to Get Professional Audio Quality: Essential Foundations
Learning how to get professional audio quality doesn't require expensive gear or years of experience. At Perfect Take Gear, we've worked with hundreds of creators who transformed their audio by focusing on fundamentals: microphone placement, gain staging, and acoustic treatment before investing in premium gear.
The difference between amateur and professional audio comes down to three controllable factors: capturing clean sound at the source, managing signal levels correctly, and treating your recording environment. Most creators skip these steps and jump straight to expensive plugins. That's backwards.
Here's what separates good audio from great: intentional gain staging that maintains a strong signal-to-noise ratio, microphone placement that minimizes room reflections, and acoustic treatment that prevents harsh frequencies from dominating your mix.
Best Microphones for Recording: Choosing the Right Mic for Your Setup
The best microphone depends on your recording environment, budget, and primary use case, not on brand prestige alone.
For most home studios, a condenser microphone offers the sensitivity and frequency response needed for detailed vocal and acoustic instrument recording. Condenser mics require phantom power (48V from your audio interface) and are more sensitive to ambient noise than dynamic alternatives. They capture nuance beautifully but also pick up keyboard clicks, computer fans, and room reflections.
Dynamic microphones have a narrower pickup pattern and lower sensitivity. They excel in untreated rooms because they reject off-axis sound more effectively. If you're recording podcasts or voiceovers in a bedroom with minimal acoustic treatment, a dynamic mic paired with proper gain staging will deliver cleaner results than a condenser mic at the same price point.
The frequency response curve of your microphone shapes how your audio translates across playback systems. A presence peak in the 2-5kHz range adds clarity and intelligibility for vocals and speech. A proximity effect (bass boost when the source is close) can add warmth to vocals but muddy instruments if not managed carefully.
Understanding Microphone Polar Patterns and Proximity Effect
A microphone's polar pattern defines which directions it accepts sound from. Cardioid (heart-shaped, rejects side and rear) is the safest choice for most home studios because it minimizes room reflections and ambient noise.
When you position a cardioid mic 6-12 inches from your mouth, the proximity effect kicks in, boosting bass frequencies and adding warmth. Move too close (2-3 inches), and you'll get a boomy bass hump that's difficult to fix in post-production. For podcast hosts and voiceover artists, this proximity effect is often desirable. For acoustic guitars or drums, it can muddy the mix. Position your mic intentionally based on this trade-off.
Microphone Placement and Gain Staging Techniques
Professional audio quality starts with how you position your microphone relative to your sound source. Placement affects tone, proximity effect, and how much ambient room noise gets captured.
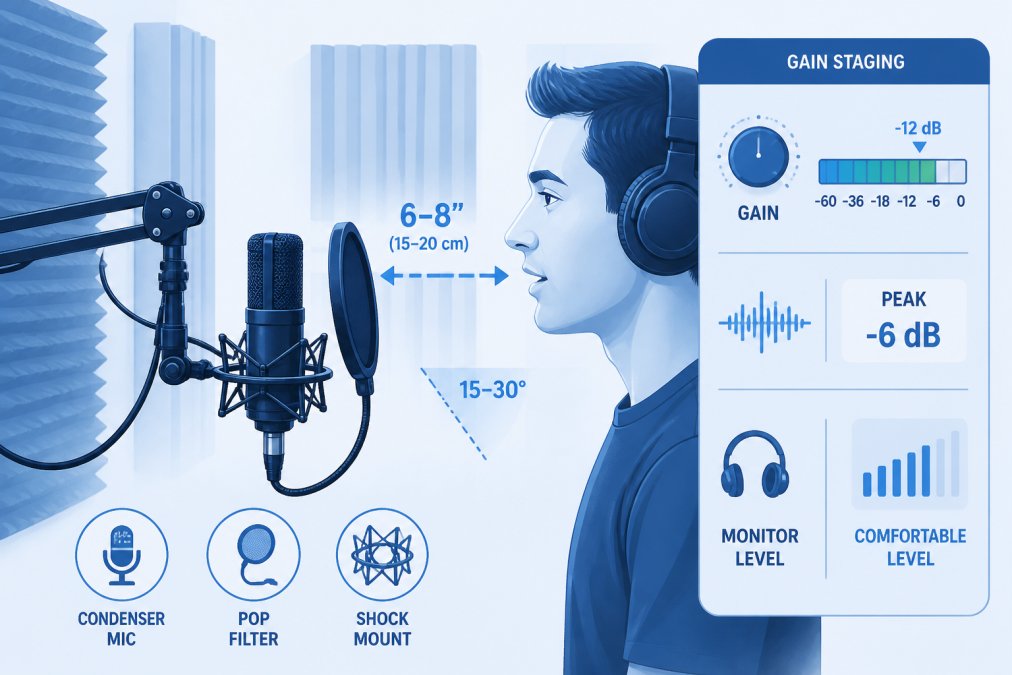
For vocals, position the mic 6-12 inches away at mouth level, angled slightly off-axis (about 15 degrees) to reduce plosive consonants without needing an aggressive pop filter. For acoustic instruments, move further away, 12-24 inches from the 12th fret of a guitar captures natural frequency balance.
Gain staging is the process of setting your input level so the signal stays above the noise floor but doesn't clip. Here's the practical workflow:
- Set your interface output to unity (0dB).
- Speak or play at normal performance volume into your microphone.
- Watch your input meter. Aim for peaks around -6dB to -3dB, leaving 3-6dB of headroom before clipping.
- Check the noise floor. When silent, the meter should drop to around -60dB or lower.
If your peaks are hitting -12dB or lower, increase your interface input gain. If they're clipping, reduce gain. The goal is a strong, clean signal that doesn't distort.
Acoustic Treatment for Home Studio: Room Environment Optimization
Your recording space has as much influence on audio quality as your microphone. Untreated rooms create reflections that muddy vocals and add resonance at certain frequencies.
Acoustic treatment works by absorbing sound energy at specific frequencies. Bass traps (thick absorptive panels) placed in room corners absorb low frequencies. Absorption panels on walls behind and beside your microphone reduce mid and high-frequency reflections.
You don't need a fully treated studio to get professional results. Strategic placement of absorptive material, even blankets, curtains, and foam, can reduce reflections by 30-50%. The most important area to treat is directly behind your microphone, where reflections bounce back into the mic.
Hard surfaces (tile, drywall, windows) reflect sound. Soft surfaces (carpets, curtains, upholstered furniture) absorb it. A bedroom with carpet, curtains, and a bed already has more absorption than a bare concrete basement. If recording in a living room, close the door to adjacent spaces and hang a heavy blanket behind your microphone position.
Soundproofing (blocking sound from entering or leaving) is different from acoustic treatment (controlling reflections inside). Soundproofing requires expensive approaches like floating walls. For home studios, focus on absorption and strategic mic placement instead.
Audio Recording Techniques: Capture, Signal Levels, and Noise Control
Professional audio quality depends on what you capture during recording, not just how you process it afterward. The cleanest recordings come from getting the right signal at the source.
Start by identifying your noise sources: computer fan noise, air conditioning hum, traffic outside. Close unnecessary applications on your computer. Turn off air conditioning during recording. Record during quieter times of day if possible. These free steps often matter more than expensive acoustic treatment.
Use a pop filter positioned 2-3 inches in front of the microphone to reduce plosive consonants. Monitor your recording in real time using headphones connected to your audio interface. This lets you catch issues like clipping, background noise, or mic rattle before you've recorded a whole take.
Gain Staging and Signal-to-Noise Ratio Fundamentals
Gain staging maximizes your signal-to-noise ratio, the difference between your desired audio and background noise. When your voice peaks at -3dB and room noise sits at -60dB, your signal-to-noise ratio is 57dB, excellent. But if you record your voice at -18dB (too quiet), amplifying it during mixing also amplifies the noise to -45dB, giving you only 27dB of clean audio.
The fix is simple: record hot without clipping. This keeps your signal well above the noise floor. Set your interface gain so your loudest peaks hit around -6dB to -3dB on the meter. Test your gain by recording 30 seconds of normal performance, then review the waveform. If peaks are consistently below -12dB, increase gain. If they're clipping, decrease gain.
Noise Reduction and High-Pass Filtering
A high-pass filter (low-cut filter) removes frequencies below a certain threshold, typically 80-100Hz for vocals and speech. Human speech has almost no energy below 80Hz. Removing this range eliminates rumble from traffic and air conditioning without affecting intelligibility.
Apply a high-pass filter to every vocal track, podcast recording, and speech-based content. Set the cutoff frequency between 80-120Hz depending on your voice. Deeper voices can go lower; higher voices can go higher.
Noise reduction software uses spectral analysis to identify and suppress repeating noise patterns. Modern DAWs include basic noise reduction tools. Capture a 1-2 second sample of pure noise (silence with only background noise), then feed that sample to your noise reduction tool. It learns the noise profile and removes it from your entire recording. Noise reduction works best on consistent, low-level noise and struggles with intermittent sounds like keyboard clicks, which are better handled through manual editing.
Mixing and Mastering Tips: EQ, Compression, and Post-Production Workflow
Once you've captured clean audio with proper gain staging, mixing shapes tone and balance. Equalization adjusts frequency content. A presence boost in the 2-5kHz range adds clarity to vocals. A cut at 200-400Hz removes muddiness.
Start with subtractive EQ: identify frequencies that sound bad, then reduce them. A vocal that sounds muddy probably has excess energy around 300Hz. Pull that down 2-4dB and listen. If it sounds thin, you went too far.
Additive EQ (boosting frequencies) should be subtle. A 1-2dB boost at 3kHz adds presence to a vocal. A 4-6dB boost sounds unnatural and fatiguing.
Dynamic Range Compression and Limiting
Compression reduces the volume of loud passages, making quiet passages relatively louder. A compressor has four main controls: threshold (the level above which compression kicks in), ratio (how much the signal is reduced), attack (how quickly compression engages), and release (how quickly it disengages).
For vocals, use moderate compression: 4:1 ratio, 10-20ms attack, 100-200ms release, threshold set so compression engages on the loudest syllables. This glues the vocal together without sounding robotic.
A limiter is a compressor with a very high ratio (10:1 or higher). Place a limiter on your master bus set to -0.3dB (just below digital maximum) to prevent peaks from clipping without affecting normal levels.
AI-Powered Audio Restoration and Spectral Balancing
Modern DAWs use AI to clean up recordings automatically. Spectral repair tools can remove clicks, pops, and unwanted noise by analyzing the frequency content of a problem sound and replacing it with surrounding audio. These tools work best on isolated problems like a cough during a vocal take or a keyboard click. Use them sparingly and critically, always comparing before and after.
Budget-Specific Workflows: Professional Quality Without Premium Pricing
Professional audio quality doesn't require expensive gear. Smart budget allocation matters more than total spending.
For creators on a tight budget, invest in this order:
- A decent microphone and audio interface combo ($150-300): This is where your audio quality lives.
- Basic acoustic treatment ($50-150): Blankets, curtains, and foam panels.
- A pop filter ($15-30): Reduces plosives and protects your microphone.
- Headphones for monitoring ($50-100): Essential for catching problems during recording.
- Software (free to $200): Your DAW (Audacity, GarageBand, or Adobe Audition).
This $265-780 setup produces professional-quality audio when combined with proper technique. Many creators spend $500 on a fancy microphone, record in an untreated room with no monitoring, and wonder why their audio sounds amateur. The Perfect Take Gear approach focuses on affordable tools that don't compromise on essentials. Pricing for starter kits depends on quantity, dates, and delivery. Please visit Perfect Take Gear's website for current prices.
Common Mistakes That Degrade Audio Quality
Understanding what ruins audio helps you avoid those pitfalls:
Recording too quietly. Creators fear clipping so they record at -18dB or lower. This forces amplification during mixing, which amplifies noise. Record hot.
Ignoring room reflections. A condenser microphone in an untreated bedroom picks up reflections from walls and ceiling. A cardioid dynamic mic or strategic absorption fixes this.
Poor microphone placement. Placing a mic too close creates proximity effect mud. Too far away captures too much room noise. Find your sweet spot: 6-12 inches for vocals, 12-24 inches for instruments.
Skipping the high-pass filter. Rumble below 80Hz adds no value to speech or vocals. A high-pass filter removes it transparently.
Overusing compression and EQ. A little compression glues a vocal. A lot makes it sound pumped and unnatural. Start with subtle settings.
Not monitoring during recording. Use headphones connected to your interface to monitor in real time.
Mixing in an untreated room. If your mixing space has reflections and resonances, your mixes won't translate to other playback systems. Treat the area behind your monitor speakers at minimum.
Getting professional audio quality is achievable with focus on fundamentals: proper microphone selection and placement, gain staging that maximizes signal-to-noise ratio, acoustic treatment that controls reflections, and mixing techniques that enhance rather than mask your source recording. Perfect Take Gear provides curated equipment bundles that eliminate guesswork. Their starter kits include a quality microphone, audio interface, pop filter, and acoustic treatment essentials, all chosen to work together. Start with clean capture, trust your monitoring, and let mixing polish what you've already recorded well.
| Mistake | Root Cause | Fix | Impact |
|---|---|---|---|
| Thin, hissy audio | Recording too quietly | Increase gain to -6dB to -3dB peaks | Removes need to amplify noise during mixing |
| Boomy, roomy sound | Untreated room or close microphone placement | Move mic back 6-12 inches or add absorption | Cleaner, more focused tone |
| Muddy vocals | Excess low-frequency energy | Apply high-pass filter at 80-100Hz | Improves clarity and intelligibility |
| Pumping, unnatural sound | Over-compression | Use 4:1 ratio, 10-20ms attack, moderate threshold | Polished without obvious processing |
| Inconsistent levels | No compression or poor gain staging | Add moderate compression to vocals | Professional, controlled sound |
Audio Engineering Society standards for recording quality
Shure microphone placement and technique guide
Recording Industry Association of America best practices for home studios
Frequently Asked Questions
What equipment do I need to achieve professional audio quality on a budget?
Start with a cardioid condenser microphone, an audio interface with phantom power support, a pop filter, and acoustic panels for your recording space. These fundamentals address microphone placement, gain staging, and room reflections, the three biggest factors in audio quality. You don't need expensive gear; focus on proper technique and room treatment first. Many creators achieve professional results with mid-range equipment when they master signal levels and noise reduction.
What's the difference between acoustic treatment and soundproofing, and which do I need?
Acoustic treatment absorbs sound reflections inside your room, improving frequency response and reducing echo. Soundproofing blocks outside noise from entering. For home recording, acoustic treatment matters more because it directly improves audio quality. Soundproofing helps if you have external noise sources like traffic. Start with absorption panels on walls and ceiling, then add bass traps in corners. This fixes room reflections that muddy your recordings and harm intelligibility.
Can I get professional audio quality with a mix of equipment from different brands?
Yes. Audio equipment works together through standard connections: XLR cables, USB interfaces, and digital audio workstations. A condenser microphone from one brand works perfectly with an audio interface from another, as long as you manage gain staging and signal levels correctly. The key is understanding how each piece contributes to your signal chain: microphone captures sound, interface converts it to digital, DAW processes it. Compatibility depends on connections and sample rate matching, not brand loyalty.
This article was written using GrandRanker