

How to Build a Home Content Studio: Complete Setup Guide
Table of Contents
- Planning Your Content Strategy and Space
- Choosing the Right Location and Room Setup
- Best Equipment for Content Creators: Essential Gear Selection
- Lighting for YouTube Videos and Professional Production
- Audio Setup for Streaming and Content Creation
- Budget Home Studio Setup: Balancing Cost and Quality
- Soundproofing and Acoustic Treatment for Studio Quality
- Setting Up Your Home Content Studio: Workflow and Integration
How to Build a Home Content Studio: Complete Setup Guide
Last Updated: July 23, 2026
Planning Your Content Strategy and Space
Learning how to build a home content studio starts with strategy, not gear. Before spending money, ask three critical questions: What type of content are you creating? How often will you produce it? Who is your audience? These answers determine everything from room selection to equipment priorities.
The difference between a functional studio and one that collects dust is alignment between your space, gear, and creative process. A podcaster needs something completely different from a product photographer.
Define Your Content Goals
Be specific about what you'll create. "YouTube videos" is too broad. "10-minute tech reviews filmed twice per week with screen recording and talking-head segments" is actionable. Document video length, upload frequency, required formats, and special requirements. Your content goals determine acoustic and lighting needs.
Assess Your Available Space
Walk through your home and evaluate potential rooms. The best studio space isn't always obvious, many creators succeed in spare bedrooms, basements, or large closets. Ideal rooms have minimal echo, few windows (easier lighting control), and enough square footage for comfortable movement.
Size matters less than acoustics. A 10-by-12-foot room is plenty for most home studios. Clap your hands in the room, does sound ring out or get absorbed? A "dead" room (sound absorbed) is easier to work with than a "live" room (sound bounces). Hard surfaces like tile create echo; soft materials like carpet and curtains dampen sound naturally.
Windows create unpredictable glare and shadows. Many professional home studios cover windows completely for consistent lighting control. Blackout curtains are affordable and solve multiple problems. Count electrical outlets in your chosen space, a full studio setup draws significant power.
Choosing the Right Location and Room Setup
Your physical space determines what's possible. A poor location forces workarounds; the right location lets equipment shine.
Natural Light and Window Placement
Natural light is free but inconsistent and difficult to control. Many professional creators eliminate windows during recording for complete lighting control. Blackout curtains solve this affordably and reduce outside noise.
If using natural light, position your desk perpendicular to windows rather than facing them directly. This creates flattering side lighting and reduces glare on your camera lens and monitor. Avoid positioning yourself with a window directly behind you, your camera will expose for the bright background and leave your face dark.
Time of day matters significantly. Morning light tends to be cooler (bluer) and more directional; afternoon light is warmer and more diffuse. If recording at the same time daily, you'll develop consistency. If recording time varies, artificial lighting becomes essential.
Minimizing Background Distractions
What appears behind you on camera shapes viewer perception. A chaotic background screams "amateur"; a clean, intentional background signals professionalism.
You have three options: use your room's existing background, add a backdrop, or use a green screen. If using your room, keep the background simple, remove clutter and consider adding a plant or accent wall. A physical backdrop stand costs under one hundred dollars and gives you a professional-looking background without redecorating.
Test your background on camera before committing. Record a short clip and watch it back. Does it feel professional? Does it distract from your message?
Best Equipment for Content Creators: Essential Gear Selection
Buying gear without a plan leads to unused equipment. Identify what you actually need, then invest in quality where it matters most.
Camera Gear and Lens Selection
Your camera choice depends on content type and budget. For talking-head content, you don't need a fancy camera. Many successful creators use smartphones or basic DSLRs. What matters is consistent framing, adequate resolution (1080p minimum, 4K preferred), and reliable autofocus.
For product reviews or tutorials requiring close-ups, a mirrorless camera offers interchangeable lenses, manual focus, and better color science. Popular options include Sony, Canon, and Nikon models. You don't need the newest model, a two-year-old mirrorless camera performs identically to this year's version for video.
Lens selection matters more than camera body. A versatile zoom lens (24-70mm equivalent) handles most situations. A 50mm lens creates flattering facial proportions for talking-head content. Shoot at 24fps for cinematic feel or 30fps for web content. Record at 1080p minimum; 4K requires more storage and processing power.
Tripod and Stabilization
A tripod is non-negotiable. It keeps your camera steady, frees your hands for gesturing, and maintains consistent framing. Invest in a tripod with a good ball head or pan-tilt head. Cheap tripods wobble and shift during recording. A solid tripod costs fifty to one hundred fifty dollars and lasts years.
For streaming or multi-camera setups, consider a capture card. It lets you use professional cameras (DSLR or mirrorless) with streaming software like OBS Studio, giving you lens flexibility while maintaining clean streaming workflow.
Lighting for YouTube Videos and Professional Production
Lighting transforms amateur content into professional work. Bad lighting makes expensive cameras look cheap; good lighting makes budget cameras look professional.
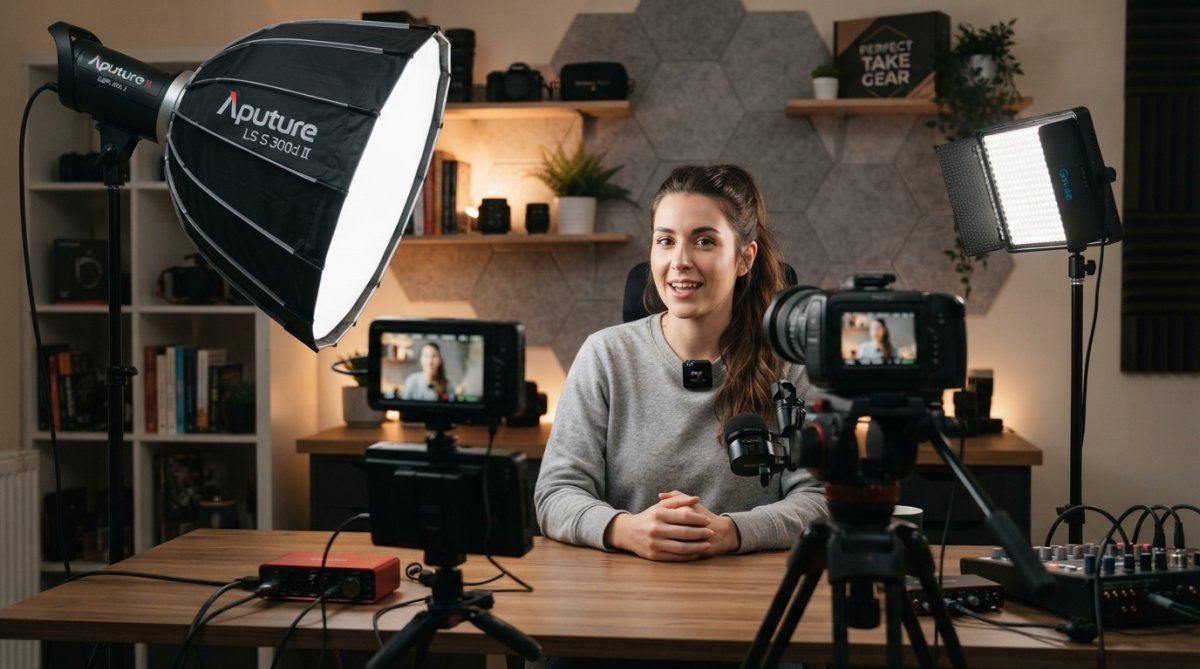
LED Lighting and Softbox Setup
LED lights are the standard for home studios. They're affordable, run cool, and give precise control over color temperature and brightness. Unlike older tungsten lights, LEDs don't heat your room or require expensive cooling.
A softbox is essential. It diffuses harsh light and creates flattering, shadow-free illumination. A 24-inch softbox is standard for talking-head content. The basic setup: one LED panel with a softbox as your main light, positioned at 45 degrees to your side. Add a second LED panel (without softbox) as a fill light on the opposite side to soften shadows.
Budget-friendly LED panels from Perfect Take Gear deliver professional results without cinema-grade pricing. They offer adjustable color temperature (3200K to 5600K), dimming control, and reliable performance for daily content creation.
Three-Point Lighting Fundamentals
Three-point lighting is the industry standard. Master this setup and you'll light anything professionally.
Key light: Your primary light source, positioned 45 degrees to one side. This creates dimension and defines facial features.
Fill light: Positioned opposite the key light, this softens shadows created by the key light. It should be dimmer than the key light, typically 50-75% of its intensity.
Backlight: Positioned behind and above your subject, this creates separation between you and your background, adding depth. Backlight should be dimmer than both key and fill lights.
Start with key and fill lights. Backlight is optional for talking-head content but refines your look as you gain experience.
Audio Setup for Streaming and Content Creation
Bad audio tanks content faster than bad video. Viewers tolerate poor video if audio is clear but abandon content immediately if audio is muffled or distorted.
Microphone Selection: Lavalier and Shotgun Options
Microphone choice depends on your setup and content type. For stationary talking-head content, a USB Condenser Microphone is simple and effective. It plugs directly into your computer and requires no additional equipment. Quality USB mics cost thirty to one hundred fifty dollars.
For movement during recording or professional control, use an external microphone with an audio interface. A lavalier microphone clips to your shirt and captures clean voice audio without room noise. Shotgun microphones mount on your camera and are directional, capturing what's in front while rejecting side and rear sound.
Position your mic 6-12 inches from your mouth for talking-head content. Too close creates plosives (harsh "p" and "b" sounds); too far picks up room noise. A pop filter (ten dollars) dramatically improves audio quality.
Audio Interface and Cable Management
An audio interface converts analog audio into digital audio your computer understands. A basic audio interface costs fifty to two hundred dollars. Popular options include Focusrite Scarlett and Behringer U-Phoria. You need only two channels for most home studios.
Invest in quality cables. Cheap cables introduce noise and fail unexpectedly. XLR cables cost ten to twenty dollars for quality versions. Use cable ties to bundle cords neatly and label cables at both ends.
Budget Home Studio Setup: Balancing Cost and Quality
A functional, professional-looking home studio costs three hundred to one thousand dollars depending on content type and existing equipment.
Starter Kits vs. Building Piecemeal
Starter kits bundle camera, microphone, lighting, and tripod at a discount. They're convenient but may include mediocre versions of each component rather than excellent versions of what you need.
Building piecemeal takes more time but lets you prioritize. If audio matters most, spend more on your microphone and less on lighting. The hybrid approach works well: buy a starter kit for basics, then upgrade individual components as you identify improvements needed.
| Component | Budget Option | Quality Option | Why It Matters |
|---|---|---|---|
| Camera | Smartphone | Mirrorless (Sony A6400) | Determines resolution, autofocus, lens flexibility |
| Microphone | USB condenser | XLR + Audio Interface | Directly impacts perceived professionalism |
| Lighting | Single LED panel | 2-3 LED panels + softbox | Eliminates shadows, creates dimension |
| Tripod | Basic tripod | Heavy-duty ball head tripod | Prevents drift, enables consistent framing |
| Background | Your room | Backdrop stand + fabric | Controls what viewers see behind you |
Prioritizing Investments for Maximum Impact
If budget is limited, prioritize in this order: microphone, lighting, camera, tripod, background.
Audio quality is non-negotiable. Viewers forgive poor video but not poor audio. A fifty-dollar USB microphone sounds dramatically better than your laptop's built-in mic. Lighting is your second priority, two LED panels with softboxes cost under three hundred dollars and instantly make content look professional. Camera comes third; your smartphone probably shoots 4K video. Tripod and background are finishing touches.
Soundproofing and Acoustic Treatment for Studio Quality
Sound bounces around rooms, creating echoes and reflections that make recordings sound hollow and unprofessional. Acoustic treatment absorbs these reflections and creates a controlled sound environment.
Acoustic Foam and Sound Treatment Basics
Acoustic foam absorbs sound energy, reducing reflections and echo. Foam panels cost ten to thirty dollars each. Place foam panels on walls parallel to your microphone and behind your microphone to prevent sound from bouncing back into it.
Bass traps absorb low-frequency sound. Bass frequencies are harder to control than high frequencies. Bass traps placed in room corners absorb these problematic frequencies. They're more expensive (thirty to eighty dollars each) but make a noticeable difference.
The goal isn't a completely dead room, which sounds unnatural. You want a balanced room where your voice sounds clear and natural without excessive echo.
DIY Solutions for Small Spaces
If budget is tight, DIY acoustic treatment works surprisingly well. Heavy curtains absorb sound almost as well as acoustic foam. Bookshelves filled with books absorb sound. Even existing furniture (couch, desk, shelves) breaks up sound reflections.
The most effective DIY solution is recording in a smaller space. A bedroom closet or small spare room has less volume for sound to bounce around in. Many home podcasters record in closets and get excellent results.
Test your acoustic treatment by recording audio and listening back. Does your voice sound natural or hollow? Adjust foam placement until satisfied.
Setting Up Your Home Content Studio: Workflow and Integration
A studio is just equipment until you integrate it into a workflow. Workflow means how content moves from recording to editing to publishing.
Post-Production Workflow Integration
Your recording setup should feed directly into your editing and publishing workflow. Organize files systematically. Create folders for each project with subfolders for raw footage, audio, graphics, and final exports. Name files clearly: "Episode-5-Raw-20260723" tells you exactly what you're looking at.
Check your editing software's specifications before recording. Different software has different requirements for video format, frame rate, and resolution. Backup your footage immediately after recording. Hard drives fail. Cloud storage is cheap. Set up automatic backups to cloud storage (Google Drive, Dropbox) or a secondary hard drive.
Capture Card and OBS Studio Configuration
If streaming or creating screen-based content, a capture card and OBS Studio simplify your workflow. A capture card lets you use a professional camera (DSLR or mirrorless) with streaming software. OBS Studio is free software that handles camera input, screen recording, audio mixing, and streaming to platforms like Twitch or YouTube.
Configure OBS with multiple scenes for different content types. One scene for talking-head content with your camera and microphone. Another for screen sharing during tutorials. Audio mixing in OBS is critical. Assign your microphone to one audio channel and your system audio to another. This lets you control levels independently without stopping your stream.
Test your OBS configuration thoroughly before going live. Record a test stream locally and verify audio levels are balanced, your camera is framed correctly, and scenes switch smoothly.
Power Management and Electrical Load Planning
A full studio setup draws significant power. LED lighting, computer, monitor, audio interface, and camera chargers can exceed single outlet capacity.
Calculate your power draw before buying. LED panels typically draw 50-100 watts each. A computer and monitor draw 200-400 watts. A single 15-amp circuit can safely handle about 1,500 watts. If your setup exceeds this, you risk circuit breaker trips during recording.
Use a power strip with surge protection rated for your total power draw. If your room has limited outlets, hire an electrician to add a dedicated circuit. It costs two hundred to four hundred dollars but prevents power issues that interrupt your workflow.
Building a home content studio is achievable on any budget, but it requires intentional choices about space, equipment, and workflow. Successful creators aren't always those with the most expensive gear, they're those who understand their content needs and build a setup supporting their actual creative process. Perfect Take Gear offers curated equipment bundles and individual components designed specifically for creators building home studios, from affordable starter kits to professional-grade lighting and camera gear. Start with audio and lighting, add a solid camera and tripod, and refine your setup as you grow. The best studio is the one you'll actually use consistently.
Frequently Asked Questions
What equipment do I need to build a home content studio?
At minimum, you'll need a camera (DSLR or mirrorless), microphone (lavalier or shotgun), LED lighting with a softbox, tripod, and audio interface. For video production, add a capture card and consider OBS Studio for streaming. A backdrop or green screen helps with professional appearance. Start with essentials and expand based on your specific content type, YouTube creators prioritize video quality, while streamers focus on real-time audio and lighting.
How much does it cost to build a home content studio?
Pricing depends on your content goals and whether you choose budget-friendly or professional-grade gear. Perfect Take Gear offers curated starter kits and individual components at various price points. For current pricing, visit Perfect Take Gear's website directly to compare options. Budget setups focus on core essentials, while professional production setups include advanced lighting, audio interfaces, and capture cards. Compare individual pieces versus bundled kits, kits often provide better value for beginners.
How do I improve audio quality in a home studio?
Start with the right microphone, lavalier mics work well for talking-head content, while shotgun mics reduce background noise. Place your audio interface close to your recording area and use acoustic foam or sound treatment to reduce reflections. Position your microphone consistently at mouth level, about 6-8 inches away. Test your audio setup before recording. Cable management prevents interference, and proper gain levels on your audio interface prevent distortion. Even budget audio setups sound professional with correct placement and treatment.
Can I mix equipment from different brands with Perfect Take Gear products?
Yes, most studio equipment uses standard connections, XLR cables for audio, tripod mounts for cameras, and universal power supplies. Perfect Take Gear equipment is designed to work alongside industry-standard gear from other brands. Check compatibility before purchasing (microphone connectors, camera mount types, etc.). If you already own some equipment, you can integrate Perfect Take Gear components into your existing setup. Contact Perfect Take Gear's team if you have specific compatibility questions about your current gear.
What's the best way to set up a small home content studio?
Prioritize a dedicated corner or small room with minimal echo. Position your camera at eye level on a tripod, set up three-point lighting (key light, fill light, backlight) using LED lights and softboxes, and place your microphone on a stable boom arm. Use a simple backdrop to control your background. Arrange cables neatly to avoid tripping hazards during long recording sessions. In tight spaces, vertical shelving and wall-mounted equipment save floor space while maintaining professional ergonomics for extended comfort during content creation.
How do I choose between DSLR and mirrorless cameras for my home studio?
Both DSLR and mirrorless cameras work well for home studios. Mirrorless cameras typically offer better autofocus, lighter weight, and compact designs, ideal for small spaces. DSLRs often have longer battery life and a wider lens selection at various price points. Consider your content type: vlogging benefits from mirrorless autofocus, while product photography works with either. Test both if possible. Ensure your chosen camera supports 4K resolution and manual white balance control for professional video quality.
Do I need a green screen for a professional-looking home studio?
A green screen is optional but useful for content creators who want to change backgrounds or stream from home offices. It's essential for virtual backgrounds in streaming and video conferencing. If space is limited, a simple backdrop or painted wall works fine for talking-head content. Professional setups often skip green screens and invest in better lighting and background design instead. Choose based on your content type, educators and streamers benefit most from green screens, while product creators prioritize lighting and backdrop.
This article was written using GrandRanker