

How to Avoid Noisy Audio: 7 Proven Techniques
Table of Contents
- Understanding Background Noise and Your Noise Floor
- How to Avoid Noisy Audio During Recording
- Hardware-Based Noise Prevention Strategies
- How to Reduce Microphone Hiss and Eliminate Hum
- Best Noise Reduction Software and Plugins
- How to Soundproof a Home Studio for Clean Audio
- Troubleshooting Common Noise Artifacts
- Conclusion
Last Updated: August 3, 2026
Understanding Background Noise and Your Noise Floor
The noise floor is the baseline level of background sound in any recording environment. Every space has one, from electrical hum to traffic rumble. Your noise floor determines the absolute lowest level of clean audio you can capture. If your noise floor sits at -40dB, you cannot record anything quieter than that without it drowning in background noise.
Background noise comes in several forms: electrical hum (50Hz or 60Hz from power lines), ambient noise (air conditioning, traffic), mechanical noise (vibrations, creaking), and microphone self-noise. Identifying which types you're dealing with is the first step toward eliminating them.
The relationship between your desired signal and noise floor is measured as signal-to-noise ratio (SNR). A healthy SNR is typically 40dB or higher for spoken word content. If your noise floor is too high, no amount of post-production processing will fully recover clean audio.

How to Avoid Noisy Audio During Recording
Preventing noisy audio during recording is exponentially easier than fixing it afterward. The best noise reduction is the noise that never gets recorded in the first place.
Microphone Placement and Environment Setup
Where you position your microphone and what environment surrounds it determines roughly 70% of your final audio quality. Position your microphone 6-8 inches from your mouth for spoken word content. This proximity gives you a strong direct signal while minimizing the relative level of background noise.
The ideal recording space has soft, absorptive surfaces that reduce reflections. Hard surfaces like tile, concrete, or bare drywall reflect sound and amplify ambient noise. A bedroom with carpet, curtains, and soft furnishings is advantageous. A bathroom or kitchen is the worst choice due to hard reflective surfaces.
Position yourself away from noise sources. Don't record next to windows with traffic outside, near fans, or close to your computer tower. Use a pop filter or windscreen to reduce ambient noise reaching the microphone capsule. A simple foam windscreen costs under $15 and noticeably reduces wind noise and ambient hiss.
Gain Staging and Levels
Proper gain staging maximizes your signal-to-noise ratio without introducing clipping or distortion. Set your input gain so your loudest peaks hit around -6dB to -3dB on your meter. This gives you headroom to prevent clipping while ensuring your signal sits well above the noise floor.
Use your DAW's metering tools to monitor levels in real time. Your peaks should never exceed -1dB, and your average levels should sit around -18dB to -12dB for spoken word. Avoid turning up gain to compensate for a noisy environment, gain staging doesn't fix a bad noise floor, it only determines how much noise you record alongside your desired signal.
Test your levels with a full dry run before recording your actual content. Speak at your normal volume, hit your peak moments, and confirm the levels stay in the safe zone.
Hardware-Based Noise Prevention Strategies
Hardware solutions prevent noise from being captured in the first place, often more effectively than software plugins.
Acoustic treatment doesn't require a professional studio. Strategically place sound-absorbing materials to reduce reflections and standing waves. Acoustic foam panels on walls behind and to the sides of your recording position absorb mid and high-frequency reflections. Bass traps in room corners absorb low-frequency buildup. A simple setup, four foam panels and two corner bass traps, costs under $200 and transforms a noisy room into a usable recording space.
Isolation shields are portable barriers placed between your microphone and noise sources. A reflection filter or isolation box surrounds three sides of your microphone, absorbing sound that would otherwise reflect back into the capsule.
Microphone selection directly impacts noise floor. Dynamic microphones like the Shure SM7B naturally reject off-axis sound, reducing ambient noise pickup. For content creation in untreated rooms, a dynamic microphone is typically the better choice than a condenser.
Use high-pass filtering at the microphone or preamp level. Most professional microphones include a built-in high-pass filter switch. Engaging this removes frequencies below 80-100Hz, eliminating low-frequency rumble from traffic, HVAC systems, and mechanical vibration.
Shock mounts and cable management reduce vibration noise. A shock mount isolates your microphone from vibrations traveling through the mic stand or desk. Proper cable routing keeps audio cables away from power cables, which reduces electromagnetic interference and hum pickup.
How to Reduce Microphone Hiss and Eliminate Hum
Hiss and hum are the two most common noise problems in home recordings, and they require different solutions.
Identifying Hiss Sources
Microphone hiss is high-frequency white noise most noticeable in quiet moments between speech. It comes from the microphone's self-noise, preamplifier noise, cable noise, or recording at too low a gain level.
Record 30 seconds of silence in your recording space with no one speaking. If you hear a consistent "shhhhh" sound, that's hiss. Self-noise specifications tell you the baseline hiss floor of your microphone. A condenser microphone rated at 12dB-A self-noise will sound noticeably hissier than one rated at 7dB-A. You cannot eliminate self-noise in post-production, only reduce it by recording at higher levels.
Preamplifier noise becomes audible when you amplify weak signals. If you record at very low input levels and then boost them in post-production, you're amplifying the noise floor of your preamp along with your signal. This is why proper gain staging is critical.
Removing Electrical Hum and Interference
Electrical hum is a persistent low-frequency tone at 60Hz (in North America) or 50Hz (elsewhere), plus harmonics. It comes from power lines, transformers, and electrical equipment.
Keep your microphone cable away from power cables. Use balanced XLR cables rather than unbalanced RCA or 3.5mm cables, balanced cables reject electromagnetic interference far more effectively. If hum persists, engage the high-pass filter on your microphone or audio interface to remove frequencies below 80Hz.
If hum persists after high-pass filtering, use a notch filter in your DAW. Set the center frequency to 60Hz (or 50Hz depending on your region), use a very high Q value (narrow bandwidth), and reduce the level until the hum disappears.
For persistent hum from multiple sources, use a dedicated hum removal plugin. These analyze your audio, detect the fundamental hum frequency and its harmonics, and remove them while preserving your desired signal.
Best Noise Reduction Software and Plugins
Post-production noise reduction is your safety net when preventative measures aren't enough. Modern software tools are remarkably effective, but they work best when your noise floor isn't catastrophically bad.
AI-Powered Noise Removal Tools
AI-powered noise removal uses machine learning to distinguish between noise and desired audio, then removes noise while preserving speech clarity and natural tonality. These tools analyze a portion of your audio that contains only noise, then use that profile to identify and remove similar noise throughout your entire recording.
Most DAWs now include built-in AI noise removal. Logic Pro has Enhance Clarity, Ableton Live has Max for Live integration with third-party AI tools, and many professional DAWs offer similar features. Standalone plugins like iZotope RX and Waves NS1 are industry standards that work across any DAW.
Setting Noise Profiles and Using Gates
Traditional noise reduction relies on setting a noise profile, a sample of audio containing only background noise. To set a noise profile, isolate a 1-2 second segment of your recording that contains only background noise. Select this segment, then tell your noise reduction plugin to "learn" or "set profile" from this selection.
After setting the profile, apply the noise reduction to your entire recording. Adjust the reduction amount carefully, too aggressive and your audio will sound thin and unnatural. Most effective noise reduction uses 6-12dB of reduction rather than trying to eliminate noise completely.
Expanders and gates are dynamic processors that reduce audio below a threshold. Set your gate threshold just above the noise floor level. Use a slow attack time (20-50ms) so the gate doesn't cut off the beginning of words. Use a moderate release time (100-300ms) so the gate doesn't flutter open and closed rapidly during pauses.
How to Soundproof a Home Studio for Clean Audio
Acoustic treatment absorbs sound energy within your recording space, reducing reflections and standing waves. A basic acoustic treatment setup includes four 2x4 foot foam panels placed on walls at ear level and above, plus two corner bass traps. This costs $150-300 and dramatically improves recordings in untreated rooms.
Soundproofing (isolation) involves adding mass and decoupling to prevent sound transmission through walls. This is more complex and expensive than acoustic treatment. However, simple isolation improvements help: seal gaps around doors and windows, add weather-stripping, and use heavy curtains or blankets to reduce external noise transmission.
For maximum isolation in a shared space, create a recording booth using heavy blankets or moving pads suspended from a frame around your microphone. Portable vocal booths serve the same purpose and cost $100-400.
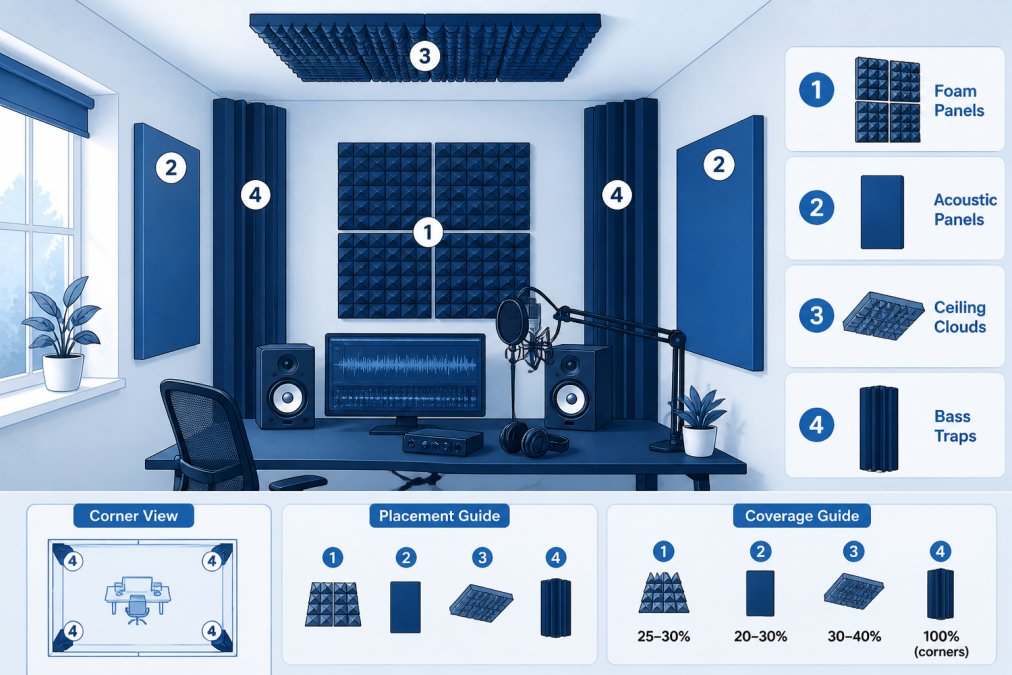
The most practical approach for home creators is combining basic acoustic treatment with microphone technique. Treat your primary recording area with foam panels, position your microphone close to your mouth, use a dynamic microphone, and engage high-pass filtering.
Troubleshooting Common Noise Artifacts
Clipping occurs when your signal exceeds the maximum level your equipment can handle, creating harsh digital distortion. This is irreversible, prevention is the only solution. Set your input gain so peaks hit -6dB to -3dB, leaving headroom.
Clicks and pops are short, sharp transients from electrical interference, microphone cable movement, or aggressive gate settings. Prevent them by using quality cables, securing cables so they don't move, and using slow gate attack times. Remove minor clicks using your DAW's click removal tool.
Artifacts from noise reduction sound unnatural and thin when noise reduction is too aggressive. Reduce the reduction amount, adjust the noise profile, or switch to AI-based tools that preserve natural tonality better.
Pumping or breathing is the audible rise and fall of noise floor level as your noise reduction engages and disengages. Increase the threshold, use a slower attack and release time, or switch to expander-based reduction which is less obvious.
Phase cancellation occurs when two audio signals are nearly identical but slightly delayed, causing them to partially cancel each other out. Fix it by adjusting the delay between tracks or inverting the phase of one track.
| Problem | Cause | Solution |
|---|---|---|
| Consistent hum at 60Hz | Electrical interference | High-pass filter or notch EQ at 60Hz |
| White noise hiss | Microphone self-noise or low gain | Use dynamic mic or increase input gain |
| Clicks and pops | Cable movement or electrical spikes | Secure cables, use balanced XLR, check power |
| Thin, unnatural audio | Over-aggressive noise reduction | Reduce amount, use AI tools, or re-record |
| Pumping/breathing | Gate threshold too close to signal | Raise threshold or use expander instead |
| Hollow sound | Phase cancellation between tracks | Adjust delay or invert phase of one track |
Creating content with professional-sounding audio doesn't require expensive studios or complex workflows. The fundamentals, understanding your noise floor, choosing the right recording environment, using proper gain staging, and applying targeted post-processing, deliver results that rival professional productions. Perfect Take Gear provides the microphones, acoustic treatment, and audio interfaces that make this process straightforward. Start with preventative techniques, add strategic acoustic treatment, and use post-production tools as backup. This approach gives you clean, professional audio that keeps viewers engaged with your content instead of distracted by background noise.
Frequently Asked Questions
What causes background noise and hiss in audio recordings?
Background noise comes from environmental sources like HVAC systems, traffic, and ambient room sound. Microphone hiss typically originates from the preamp gain being too high, poor cable shielding, or low-quality equipment. Electrical hum at 50 or 60 Hz usually indicates interference from power lines. Understanding your noise floor helps you set proper gain staging to keep signal above unwanted noise without clipping.
Is it better to prevent noisy audio during recording or fix it in post-production?
Prevention is always superior. Fixing noise in post-production using noise reduction plugins can introduce artifacts and degrade audio quality. By controlling your recording environment, using proper microphone placement, and setting correct gain levels, you capture clean audio from the start. Post-production tools work best as a final polish, not a primary solution. Preventative techniques save time and preserve vocal clarity.
How do I reduce microphone hiss without losing audio quality?
Start by lowering your preamp gain and moving your microphone closer to the source. Check for damaged cables and use shielded XLR cables to reduce interference. In your DAW, apply a high-pass filter to remove low-frequency rumble, then use a noise gate to mute audio below a specific threshold during silent passages. For persistent hiss, AI-powered noise reduction tools can target frequency-specific noise while preserving vocal detail better than traditional plugins.
What's the most affordable way to improve audio quality for streaming or content creation?
Start with your recording environment: add soft furnishings like curtains and blankets to absorb sound, position your microphone 6-8 inches from your mouth, and use a pop filter. Invest in a quality USB microphone or affordable condenser mic with proper gain staging. Free or low-cost DAW software often includes basic noise gates and high-pass filters. These preventative steps cost little but deliver dramatic improvements in audio clarity compared to expensive post-production fixes.
This article was written using GrandRanker