

Budget Home Video Studio Lighting: A Beginner's Guide
Table of Contents
- Why Home Video Studio Lighting Matters for Content Quality
- Three-Point Lighting Setup for Beginners
- How to Diffuse Harsh Studio Lights for Natural Results
- DIY Video Lighting Hacks Using Household Items
- Essential Budget-Friendly Lighting Equipment and Alternatives
- Color Temperature and Kelvin: Getting the Right White Balance
- Setting Up Your First Budget Studio: Step-by-Step
- Common Mistakes to Avoid When Building a Budget Setup
- Frequently Asked Questions
Last Updated: September 27, 2026
Why Home Video Studio Lighting Matters for Content Quality
Good lighting transforms your content. It's the difference between looking amateur and looking professional. The right home video studio lighting setup makes your skin tone appear natural, keeps your subject in focus, and eliminates harsh shadows that distract viewers.
Content creators who invest in proper lighting see immediate improvements in viewer retention. Audiences respond to clear, well-lit video. Bad lighting signals low production value, even if everything else about your content is solid.
The challenge is building a lighting setup for home video studio on a budget without spending thousands. Most creators assume professional lighting requires expensive gear. That's not true. Strategic placement of affordable lights, combined with smart use of household items, creates studio-quality results at a fraction of the cost.
Perfect Take Gear specializes in helping creators build professional setups without breaking the bank. We understand the constraints of home studios: limited space, tight budgets, and the need for gear that actually works.
Three-Point Lighting Setup for Beginners
Three-point lighting is the foundation of studio lighting. It uses three separate light sources to control how your subject appears on camera. This setup works for interviews, tutorials, product reviews, and any talking-head content.
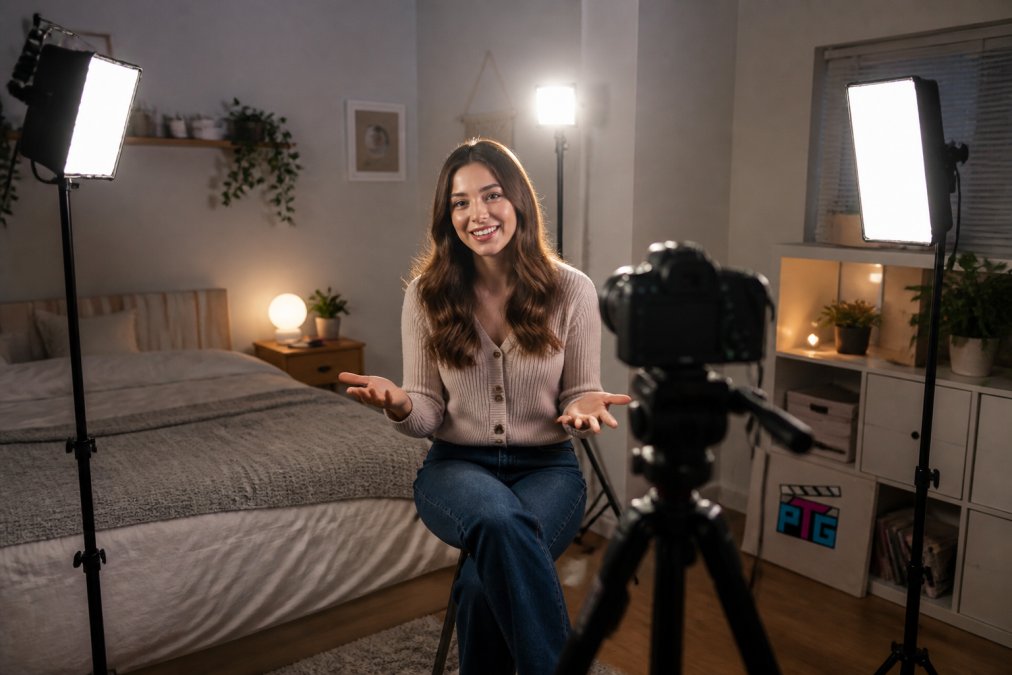
The three points work together. Each serves a specific purpose. Master this setup and you've mastered the foundation of professional video lighting.
Key Light: Your Primary Source
The key light is your main source. It's the brightest light in your setup. Position it at a 45-degree angle to your subject, slightly above eye level. This angle flatters most faces and creates natural-looking shadows.
The key light does the heavy lifting. It illuminates your subject's face and controls the overall mood of your video. Stronger key lights create more dramatic lighting. Softer key lights feel more approachable and friendly.
Distance matters. Move the light closer for brighter output. Move it back to soften the effect. Most creators position their key light 3-6 feet away from their subject.
Fill Light: Reducing Shadows
The fill light softens shadows created by the key light. Position it opposite the key light, also at roughly 45 degrees. The fill light should be dimmer than the key light, roughly half the brightness.
Fill lights prevent your subject's face from appearing half-dark. They create a more balanced, even look. Without fill light, one side of the face falls into shadow, which can look unflattering or dramatic depending on your intent.
Many creators skip the fill light to save money. Don't. A simple reflector or second affordable light source serves this purpose effectively.
Backlight: Creating Separation
The backlight sits behind your subject, pointing toward the camera. It creates separation between your subject and the background. This separation makes your subject appear to pop off the screen.
Backlight is subtle but powerful. It adds dimension to your shot. Without it, your subject blends into the background, looking flat and two-dimensional.
Position the backlight high and slightly off to one side. Adjust its intensity so it's visible but not overwhelming. The goal is gentle separation, not a harsh rim around your subject.
How to Diffuse Harsh Studio Lights for Natural Results
Raw light from a bare bulb looks harsh. It creates dark shadows under eyes and cheekbones. Diffusing light spreads it across a wider area, softening shadows and creating a more flattering appearance.
Diffusion is essential for skin tones. Harsh light emphasizes texture, pores, and imperfections. Diffused light smooths appearance and looks more natural on camera.
Several tools diffuse light effectively:
- Softboxes spread light over a large area, reducing shadow intensity
- Umbrellas bounce light off a reflective surface, softening the output
- Diffusion fabric placed in front of a light source scatters rays
- White bedsheets work as budget diffusers in a pinch
The larger your diffuser, the softer the light. A 2-foot softbox creates softer light than a 1-foot softbox. For home studios, 24-inch to 36-inch softboxes offer good balance between coverage and space requirements.
Experiment with distance. Move your diffuser closer to create softer light. Move it back to increase brightness while maintaining diffusion. Most creators position diffusers 12-18 inches in front of their light source.
COLBOR W60/W100 Handheld COB LED Light →
DIY Video Lighting Hacks Using Household Items
Professional lighting gear is expensive. Household items deliver surprisingly good results at zero cost.
White bedsheets and curtains function as diffusers. Hang them in front of your light source to scatter harsh rays. Tape them to a simple frame or hang them from a clothing rack. This creates soft, even light across your subject.
Aluminum foil reflects light effectively. Crumple it slightly to avoid mirror-like reflections. Tape it to cardboard and position it opposite your key light to serve as a fill reflector. Smooth foil creates sharper reflections. Crumpled foil creates softer, more diffused bounce light.
White poster board works as a reflector or diffuser. It's cheap, easy to position, and surprisingly effective. Prop it against a chair or tape it to a wall. Use it to bounce light or soften harsh shadows.
Desk lamps and household lights provide basic illumination. They're not ideal, but they work in a pinch. Avoid mixing color temperatures.
Essential Budget-Friendly Lighting Equipment and Alternatives
Building a budget setup means choosing equipment wisely. Focus on versatile pieces that serve multiple purposes. When you're ready to invest in quality gear, Cameras, Lighting & Audio Equipment provides a curated selection of practical equipment at accessible prices, designed for creators at every budget level.
LED Panels and Handheld Lights
LED panels are the modern standard for content creators. They're efficient, cool to the touch, and adjustable. The COLBOR W60/W100 handheld COB LED light offers compact, portable lighting with adjustable color temperature from 2800K to 6500K. At 345 grams, it fits in a camera bag and works for on-location shoots or home studio setups.

Ring Lights for Close-Up Content
Ring lights excel for beauty content, tutorials, and any close-up work. The Yidoblo FD-480II 18-inch ring light delivers 96W of adjustable brightness with a CRI above 95 for accurate color rendering. Color temperature ranges from 2700K to 7500K, offering flexibility for different shooting conditions.
Softboxes, Reflectors, and Diffusers
Softboxes attach to continuous lights or flash units. The SH LED Studio Light with Bowens Mount works with various softbox accessories. Softboxes come in rectangular, octagonal, and parabolic shapes. Rectangular softboxes work well for full-body shots. Smaller softboxes suit close-up work.
Color Temperature and Kelvin: Getting the Right White Balance
Color temperature measures light warmth, expressed in Kelvin. Lower Kelvin values (2700K-3000K) appear warm and orange. Higher Kelvin values (5500K-6500K) appear cool and blue.
Setting Up Your First Budget Studio: Step-by-Step
Building your first setup takes planning. Follow these steps to create a functional, professional-looking studio.
Step 1: Assess Your Space and Camera Setup
Measure your shooting area. Determine how much space you have for lights, reflectors, and your subject. Small spaces require compact equipment. Larger spaces offer flexibility.
Step 2: Choose Your Primary Light Source
Start with one quality light source. This becomes your key light. Choose based on your budget and shooting style.
Step 3: Add Fill Light and Reflectors
Your second addition should be fill light. This can be a second LED panel, a reflector, or a household light source.
Step 4: Position Your Backlight
Once key and fill lights work well, add backlight. Position it behind your subject, pointing toward the camera. Adjust height so it illuminates the back of your subject's head and shoulders.
Step 5: Test and Adjust for Your Content Type
Film test footage. Review it on your camera's screen and on your computer. Shadows under eyes should be subtle, not dark. Your subject's face should appear evenly lit and natural.
Common Mistakes to Avoid When Building a Budget Setup
Mixing color temperatures is the most common mistake. A 3200K key light with a 5500K fill light creates unnatural skin tones. Choose one color temperature and stick with it across all lights.
Frequently Asked Questions
What is a good budget light for video recording?
LED panels and handheld COB lights are excellent budget options. The COLBOR W60 ($202.99) offers 60W power with adjustable color temperature (2800K-6500K) and weighs just 345g, making it portable and versatile. For stationary setups, the SH-TYD-135 studio light ($133.99) delivers up to 18,000 lux with stepless dimming and includes a tripod. Both have CRI ratings above 95, ensuring accurate color rendering for professional-looking video.
What is the three-point lighting setup and how do I do it cheaply?
Three-point lighting uses a key light (main source at 45 degrees), fill light (opposite side to reduce shadows), and backlight (behind subject for separation). To do it cheaply, use one affordable LED panel as your key light, a reflector or white poster board as your fill light, and a second budget light or even a desk lamp with daylight bulbs as backlight. This approach costs under $200 and creates professional separation and depth without harsh shadows.
How do you light a small room for video production?
In small spaces, position lights at angles rather than directly facing your subject to avoid overwhelming the room. Use diffusers or softboxes to spread light evenly and reduce harsh shadows. Mount lights on light stands or camera mounts to save floor space. Handheld lights like the COLBOR W60 work well in tight areas because they're compact (345g) and don't require heavy stands. Reflectors bounce existing light to fill shadows without adding more equipment, making them ideal for cramped home studios.
Can I use household lamps for video lighting?
Household incandescent bulbs create warm, inconsistent light unsuitable for video. However, you can repurpose desk lamps and floor lamps by replacing bulbs with daylight-balanced LED bulbs (5500K-6500K). Wrap white fabric or parchment paper around them as a DIY diffuser to soften harsh light. This works for fill light or backlight in a pinch, but dedicated video lights offer better color accuracy (higher CRI), dimming control, and consistent brightness, essential for professional-looking content.